Archive | Project RSS feed for this section

Hawaiian Bridal Shower

12 Jan

Last July my bridesmaids threw me a Hawaiian themed bridal shower.  Here is a moodboard that was used for some ideas for the party.

We search the internet for some inspiration, most of the photos were found on pinterest, some can be seen on my party board.  We searched for luau, hawaiian and tropical to find some ideas.

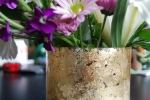
The main colors were magenta, orange and bright green.  I found some bright green vinyl table clothes at Meijer with some of their summer seasonal products.  We found most of the other decorations at party and dollar stores.  We made tissue paper poms to hang from the trees, I think we just used string and tied the poms to tree branches.  Tiki torches were lit around the area.  Family and friends made food to go along with the theme, like pinapple and chicken kabobs.  There were leis and the girls made flower hair clips by hot gluing hair clips from hobby lobby onto hibiscus and orchid flowers they got from the dollar store.  The prizes for the games were in colorful sand buckets.

Made in excel and printed for guests

The girls came up with some fun games they found online and customized for the shower.  One game we played was Bride Bingo, the guests were given a blank bingo card that we made in excel.   Before I opened my gifts guests had to fill in the blanks with gifts they thought I would get then as I opened my gifts they checked off a box if they had it on their card.  Just like bingo whoever filled in a row first and yelled Bingo won a prize.

Another game the girls did was 20 questions.  They came up with 20 questions about my husband and I, some easy some more difficult.  This was also made in Excel and printed for guests, the guests had a few minutes to answer the questions then the bridesmaids took turns reading the questions out loud and had the guests yell out what they thought was the answer.  The guest that got the most questions correct won a prize.  Some of the questions were ‘where did the bride and groom meet?’, ‘where did the groom propose?’, ‘how long have the couple been together?’, ‘what was the bride/groom’s first job?’, ‘what foreign language did the bride/groom take in high school?’, and ‘what is the bride/groom’s middle name?’.

Another fun game played was Purse Raid.  The girls found a list of things that the guests had to find in their purse, the first person to find the item won a prize.  The girls had a list of 10-12 items and throughout the party they would yell out “Purse Raid!” and the item guests were suppose to find.  This way most people will get a prize, I think they had small bottles of lotion for the prize.  Some of the things on the list included a toothpick, keys, child’s toy, lipstick, giftcard, a pen.

The decorations, food and Hawaiian music that we played on my laptop really tied everything together, but it was so great spending time with family and friends.  I can’t wait to throw a bridal shower for my sisters some day 🙂

Here are a couple of photos that were taken during the party

My sisters and I, to the left is the Maid of honor on the right is one of the bridesmaids

Amanda hanging the decorations

Guests talking before the party
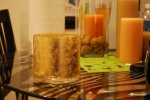
The dessert table

Here is the invitation (some information blurred out for privacy reasons) that my Maid of Honor and I designed together

Invite designed by Amanda and I

Centerpiece Idea from Green Wedding Shoes

19 Apr

This wedding photo shoot set up by and featured on Green Wedding Shoes is so beautiful!  I love the centerpieces, I think I might use this idea for our centerpieces.

Save the Dates are in the Mail!

13 Apr

I’m mailing out our last few save the dates today, then it’s on to our invitation design.

I made our save the dates in Adobe Illustrator, with some help from my fiance.  We made them 4×6 post card size and printed them through nextdayflyers.com.  I’ve recently found out about Vistaprint.com where they print invitation suites.

I used a bunch of different fonts, I guess it’s a “rule” to not use a lot of different ones but I don’t really like following design rules.  And I’ve seen invitations and save the dates online that have done the same thing, and I think they look great!  As long as it’s pleasing to the eye and people can read it, it shouldn’t matter.

So, back to my design.  I played around with color but we ended up using only black and white.  On the back (the side with out the address) I actually used 5 different fonts, with a black background, white font and white floral pattern.  On the front I split the card in half with a line down the middle on the left I used the same floral pattern and listed our blog for guest accommodations and travel information.

On the right side, I messed up… in Illustrator I had some lines where the addresses would go to get a better idea of how to split up the design and didn’t get rid of them before we had the design printed.  We didn’t really think about how we would address the cards and having those lines made things a little difficult.  If we wanted to print the addresses right on the cards we would have to get the spacing right and when we practiced some of the addresses came out crooked.  Also, we were using an inkjet printer, if the ink gets wet it smudges and I didn’t like that.  We thought about using labels, white would be really obvious because it’s brighter than the white on our cards.  We ended up buying clear labels for our laser printer.  We also ran into a problem with the size of the labels, I found the right size online but they weren’t available in stores.  Since we took too long designing the cards and then longer getting our addresses together (side note, start getting your addresses early! we had a hard time getting hold of people and then it took people a long time to get back to us with the addresses) I didn’t have time to order the labels.  I bought a pack of 100 2″x4″ Avery labels, #15663.  Because the labels were larger than the space I had, I centered the addresses and used a paper cutter to cut down each side of the labels.  I created a spread sheet in excel, then brought it into word, created a mail merge with a template for the labels I have.  You can edit the individual labels when you are finished merging the documents, it’s pretty easy to do.

I didn’t mind the extra work too much and I love how they turned out!  Check out the photos below.

Now I have to make sure I get these last few out before they change the price of my stamps on the 17th!

Super Bowl Party

21 Feb

Sorry it took my so long to post this, I kept forgetting about it!
Here is what I did for out Super Bowl party:

This slideshow requires JavaScript.

Our food table for the 2011 Packers/Steelers Super Bowl

Cubeecraft Packers put together, found here : http://etchings13.deviantart.com/gallery/27571306

Super Bowl Party Decor Supplies

1 Feb

I finished getting all the supplies that I need to start my decorations for our Super Bowl party!  Here are a few photos of what I got and where I got everything.


1. Football Plates from Party City

2. Dark Chocolate Melts from Hobby Lobby for Football Cakepops (I haven’t attempted these yet, hopefully they work out!)

3.Football rings from a local cake shop that I will use as cupcake toppers

4. Dark brown cupcake papers from local cake shop

5. White, black and silver poster board.  I’m going to draw the Packer G, a foam finger and football on the white poster board.  I’m using the black poster board like a chalkboard to draw plays on.  I might make a cut out of the Lombardi trophy with the silver poster board.  Bought at Hobby Lobby

6. Chalk for the black poster board, from Hobby Lobby

7. Yellow napkins from Party City.  Represent the penalty flags that referees throw

8. Tissue paper from Hobby Lobby.  The striped tissue paper was the only thing I could find that looked like a referee shirt, I plan on cutting triangles for flags to hang, you can sort of see what I mean in my sketch below.

9. & 10.  Balloons and streamers from Party City

11. Cubeecraft paper “dolls” I found on Deviant Art. I’m using these instead of football cake toppers for on the table.  They look awesome when they’re cut out and put together, but they’re a pain, you’ll need some patience if you plan on using these.  I recommend printing them on card stock, I didn’t do that and really wish I had.  I have two put together so far, but didn’t take any photos yet

12. Green and White felt, white ribbon all from Hobby Lobby.  I bought one yard of the green felt, I think it’s 72″ wide. if I’m making a football field tablecloth.  The white felt is for the numbers and the ribbon is for the yardage lines

13. A toy football from Party City

14. Ideas that I sketched out

I forgot to include the “coasters” in the photo I took of my supplies.  I looked all over for this stuff, I still don’t know what it’s actually called. Astro Turf? Faux Grass? Most of the hardware stores had a roll that was about 15 feet wide and that was a lot more than I needed so I kept looking.  Home Depot had a large roll too but right above it there were a bunch of samples already cut into squares.  I wanted to grab more, but I already felt bad taking four :/

The snow storm started and is suppose to go on until tomorrow afternoon so I don’t plan on going anywhere tomorrow, I should be able to get some decorations done and post a few photos.

Super Bowl Party Ideas

30 Jan

Here are a few party ideas I have found from various websites and blogs

The first photo is from Hostess with the Mostess

Second from Real Simple

Third From Camille Styles via Coco Kelley (click on the Coco Kelley link for the full post)

I really like the colors from the Camille Styles moodboard, they work really well for a Packers Super Bowl party.  I would use mostly Dark brown, black, and green and have pops of yellow.  My favorite ideas are the astro-turf coasters, the football field table cloth and the chalk board table cover.  I don’t think I have time to get chalkboard contact paper but I think black craft paper would work well to draw some plays on, you just can’t erase it.  I really want to find some little football players but haven’t seen any at the party stores.

Hopefully I can get some projects done early this week and get them up right away! We’re suppose to get about a foot of snow between Tuesday and Wednesday, I can use that as an excuse to stay in and get these projects done.  I’ll have to make sure I get all the supplies I need tomorrow.

Project: Mercury Glass Vase

18 Jan

I started my first project!

I like the look of mercury glass for candle holders and vases, but I’m having a hard time finding the sizes and shapes that I want.  I attempted to make a faux mercury glass vase.

I bought a kit that has gold leaf, adhesive and sealer.  The kit was only $10 at Hobby Lobby and I had a 40% off coupon.  I would have rather used silver leaf to get the look of mercury glass but they only had the kit with gold leaf, they do sell silver leaf and the adhesive and sealer separately but I wanted to test it out before I put more money into the project.  It was $4 for a jar of sealer or adhesive and $8 for the spray, I think the silver leaf was $10.

To start I washed a clear, cylinder glass vase and dried with a paper towel.  Coated the inside of the vase with the adhesive, the instructions said to let it sit for 30-60 minutes until it was tacky but it only took about 5-10.  Next I tore small pieces from a 5 1/2″ x 5 1/2″ gold leaf sheet and applied it to the inside of the vase with my fingers.  It’s a little tedious, but I really like how it came out.  I used 3 of the gold leaf sheets to fill in the vase.  The vase is about 5″ tall and 5″ wide.  After I finished putting the gold leaf on I ran my finger along the inside of the vase to break off any loose pieces and make sure everything was pushed down. Then I applied a layer of sealer with a paint brush.  Now I just have to wait until it dries and I can test it out with some water and see how it holds up.  I’m assuming the adhesive and sealer are flammable so if I do this for candles I’ll have to do it on the outside of the glass or find another way of adhering the leaf to the glass.  Here are some photos of the process.

UPDATE:

My FI gave me flowers yesterday, he brought them home after work! I took this as an opportunity to test out the gold leaf vase.   Unfortunately the sealer doesn’t do well with water, it looks like it did when I first put it on the vase before it dried clear.  It’s foggy where the water is but fine above the water level. (See photos above)  If I do the gold or silver leaf for vases and candle holders it will have to be done on the outside of the vase.  I’ll try it on a candle holder next.


Project to do list

14 Jan

I’m hoping that, by putting this up online, it will help get me motivated to actually start a project! Aside from getting started I need to work out a budget for my DIY projects, I have no clue as to how much anything is going to cost, let alone what materials I want/need to buy. That’s not the fun part, so I keep putting it off. I like coming up with the ideas and making them, I don’t want to plan what I need and figure out how much it’s going to cost. I guess if I want us to stay in our budget it’s something I’m going to have to do. I think if I tackle one project at a time it will be a little easier.

So, here’s the list of projects. It most likely will change as the Wedding gets closer (239 days!). At least it’s a starting point.

Stationary – Save the Dates, Invites, Programs, Table Numbers, Place Cards
Aisle Runner – With our names and wedding date printed, matching our invites
Pew Decorations – Not really sure what I want yet
Unity Candle –
Decorations for the Church –
Decorations for the Reception – String lights(bought), Fabric to hang? Candles, Photos of us?
Photo Booth – Buy software, Make backdrop, Lighting?
Guestbook – Scrapbook for photos from booth, pens in wedding colors
Props for Photo Booth – Felt and dowels, chalkboard paint, foamcore
Cupcake Tower – Cake Circles or Nice Plates, Styrofoam Cylinder as base or candle stick holders
Cake Topper – Wooden Dolls, Acrylic Paint
Decor for: Cake Table, Gift Table, Fireplace Mantle, Escort Cards
Fascinators – Feathers, Fabric, Netting
Garter – Elastic, Ribbon, Fabric
Jewelry – Beads, Chain, Findings
Boutonnieres? – Not sure if I want the Florist to make them or if I want to do something different
Pillow for the Ring Bearers – Fabric, Ribbon, Stuffing
Basket for Flower Girl – If we decide to have one
Just Married Sign – Paper, Ribbon
Card Box – Boxes, Paper, Ribbon
Send Off – Need to decide what we’re doing – Sparklers?

This is all I can think of right now. It looks like I still have a lot of decisions to make…

Mini Tree Centerpieces

16 Dec

I’ve been playing around with a few ideas for the table centerpieces and came across these small cedar trees in square vases, by JL Designs.  Maybe have a small grouping surrounded by candles.  Or we could stick little flowers in the trees.

I love the little dog they put in the photo 🙂

Fascinators

9 Dec

I’m going to try to get together with the girls over Christmas to do some wedding projects and planning.  Fascinators are the main thing that I want to work on with them.

Here’s the description of what a fascinator is on Martha Stewart Weddings

Bigger than a barrette, a fascinator is a hair accessory that’s worn to the side and is often made of feathers, flowers, or wisps of fabric. The fun, fanciful ornament is often embellished with crystals, beads, or loops of ribbon, and attaches via a comb or headband; some have a small, stiff, flat base that can be secured with bobby pins.

So since the girls will be wearing black dresses the fascinators can be more colorful, something that goes along with the flower color scheme.  Like magenta, purple or green.

Here are some fascinators I found on Etsy,  I’ll have to look for the links and post them later.